

Para esta página en español, haga clic en "seleccionar idioma" en la parte inferior.
Artsy Thursday allows children to develop creativity, social skills, and fine muscles with open-ended art projects that let them make choices, use their imaginations, and create with their hands.
 Art projects offer children and families many benefits. Child development and pediatrics experts agree that even short spurts of creative time greatly impact children's social, cognitive, and emotional development in their earliest formal years and create long-lasting memories. It’s important to remember that a meaningful art project doesn’t need to take a lot of parent preparation time.
.
? Use the tips, resources, and project ideas in the tabs below.
Art projects offer children and families many benefits. Child development and pediatrics experts agree that even short spurts of creative time greatly impact the social, cognitive, and emotional development of children in their earliest formal years and create long-lasting memories. It’s important to remember that a meaningful art project doesn’t need to take a lot of parent preparation time.
Here are a few tips to help busy families engage in meaningful art projects.
Eliminate the pressures that make art projects difficult
Art projects don’t need to take a lot of parent prep time. Use items that you already have around the house – like paper towel rolls or cotton balls – to eliminate the time needed to go to the store and purchase special supplies. And keep staple items on hand that can be used for a variety of art projects - such as paper, paint, tape, crayons, and glue. You can take them out and add other items you have to the mix.
Let children take the creative lead
Parents promote creativity, thinking, planning, and other important skills when they let kids take the lead on art projects. The creative spark is lit when kids try to figure out how things work on their own.
A number of recent studies have shown that young children display more advanced cognitive skills when adults use less instruction. One of the key reasons is that this allows kids to practice what’s known as “counterfactual” reasoning, the process of mental “trial and error” that is an early emerging aspect of innovative thinking. For example, ‘What happens if I paste this piece of fabric here instead of there?’ or ‘What if I paint this dog green?’ Parents can support the roots of innovation by hanging back and encouraging kids to try out their own ideas versus giving a strict pattern to follow.
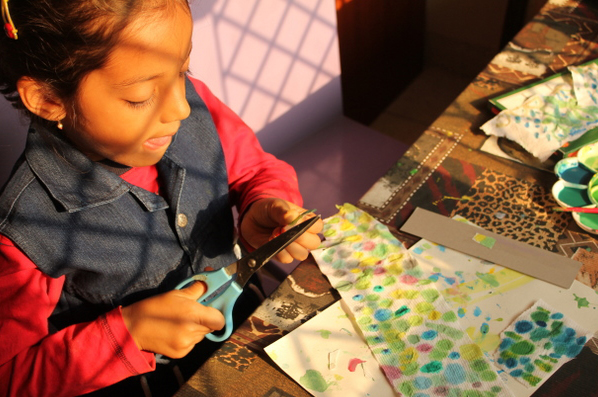
Allow children to use their hands to create their project
Art projects also offer many ways for children to build their small muscles and improve their fine motor development. When children use scissors, squeeze a glue bottle or mold clay they strengthen the muscles needed to master using a pencil at school later on.
Support but don’t take over
The benefits from doing art projects independently are critical for academic readiness.
Parents can support their children by encouraging them, helping with suggestion, and stepping in only when really needed. While it might take your child longer to open a glue bottle or paint tube, these are important ways children can develop the muscles they will need for school.
Praise their efforts, not the product itself
It’s clear from the research that praising children for their effort, not the quality of the final product, supports the future mindsets that underlie success in academics, sports, and arts.
Art projects offer a perfect platform for encouraging and reinforcing effort rather than focusing on the outcome.
For example, parents can acknowledge something specific a child spent time on like making a particularly interesting color when mixing paints or acknowledging a specific skill like cutting with scissors instead of focusing on how the final project looks.
Remember – you’re creating happy memories
The fact that you’re supporting your child’s creativity and spending time together is important. One of the most important benefits children and parents both reap from arts and crafts is that, years from now, it won’t matter what was created, just that it was created as children and parents spent time together.
Interesting materials, smiles, laughs, and some silliness keep kids engaged. Not only will this lead to cognitive benefits, but also bonding time with parents. Kids will form lasting memories that will stay with them for years to come.
Richard Rende, PhD is a developmental psychologist, researcher, author, and educator. He recently teamed up with Elmer’s to further explore the impact of creative time on our children’s long-term success and through this research, found the majority of those surveyed wished they had more time to engage in arts and crafts with their children.
Chalk is not only fun to use but also an educational material that kids should be exposed to often. It is a great way to build fine motor control and creativity.
1. Draw and Write on Construction Paper
Construction paper is just coarse enough to offer a lovely surface for drawing and writing with chalk. Nighttime pictures made with white chalk on black or dark blue paper can be especially fun.
2. Play School
While “playing school” with a friend, children draw and write on large chalkboards or individual slates. They can take turns playing the parts of the teacher and student while giving and completing “assignments.”
3. Paint with Wet Chalk
Place low dishes of water on the table. Dip the ends of the chalk sticks into the water, immediately painting onto paper. Dark-colored construction paper is often the best choice. The wet chalk forms a paint that is smoother and brighter than the original chalk.
4. Paint with Chalk and Water
Get your child to draw a picture with chalk on watercolor paper. Use paintbrushes dipped in water to paint over the lines of their pictures. The end result is a painting that looks much like art with watercolors.
5. Practise Letters and Numbers
You can tell when your child is ready to start practicing the writing of letters and numbers. They ask how to form them, begin trying on their own, and beg for TONS of paper.
A reusable surface like a chalkboard is great, and you can make a fun and cheap eraser with a holey or outgrown sock they wear on their hand or use a chalk eraser.
6. Draw and Write on Walls and Windows
Most home improvement stores sell blackboard wall paint. Some of these products work better than others, so do your homework when choosing a brand. Paint a wall in the playroom, your child’s bedroom, or the kitchen. The paint can even be used on windows.
7. Draw Roads and Tracks
Ask your child to draw a city with chalk, complete with roads and “bridges,” or a racetrack. Your child can push their toy cars, trucks, and other vehicles along the roads.
8. Make their Chalk on Paper Masterpieces Permanent
Well out of children’s breathing distance, lightly spray the papers with a light film of aerosol hairspray, which works as a clear fixative.
9. Create Chalk Rubbings
Place thin items with texture underneath newsprint or copy paper: leaves, twigs, coins, and keys. Using the chalk on its side, get your child to rub over the top of the items, which leaves the pattern on the paper.
10. Mix Coloured Chalk with Salt
For use in a sensory bin or table, mix ground, colored chalk with table salt. This mixture can be scooped, measured, poured into funnels, and built into roads to drive small play vehicles while enjoying color.
11. Use Chalk in a Science Experiment
Add crumbled or broken chalk pieces to a clear cup of white vinegar. Watch for the bubbles that soon begin to rise. The calcium in the chalk reacts with the acidity of the vinegar. This forms carbon dioxide gas, which is then revealed as bubbles.
12. Chalkboard Dot-to-Dot
Design a dot-to-dot picture on a chalkboard for your child. They can connect the dots by completing the image or progressing through the numbers in the correct order.
13. Trace Shadows
Children learn a great deal about the sun’s movement by observing and noting the shadows at various times of the day.With chalk on cement, they can trace the shadows of trees and other objects outdoors or of a willing person who is standing still for a few minutes. After tracing, they can draw and color in the details.
14. Create a Maze
Mazes are super fun to make and walkthrough. On cement, help them draw the first chalk maze, be sure to follow with ideas of their own. Challenge them to find a way out of the maze.
15. Play Hopscotch
With sidewalk chalk, draw a hopscotch outline with 8-10 squares, rectangles, or triangles, on a sidewalk, driveway, or patio. Add the numbers in order. For each turn, your child throws an object, like a small rock or bottlecap, either onto the numbers in order or toward whichever number he wishes. As he hops through the outline, he must first skip over the one that holds the object. Coming back, he picks it up and returns to the beginning.8
16. Draw an Obstacle Course
On a wide driveway or patio, draw an obstacle course for your child to use on foot or with small riding vehicles. Add lines spaced apart for jumping and hopping, curvy lines for crawling, numbers to show how many times a certain feat must be accomplished, and directions in words like “slow,” “fast,” “start” and “end.” For vehicle use, objects like ramps can also be added.
17. Play in a Chalk House
On a large cement area, budding interior designers and architects can draw chalk houses. To the outlines of rooms, they can also add drawings of furniture and household objects. For literacy practice, they can label rooms with the words or first sounds they hear, like “b-B” for “bedroom.”
18. Walk and Race on Chalk Pavement Patterns
Draw wacky spirals, waves, and zig-zag patterns on the pavement. With siblings or friends, take part in walking and running races to see who can stay on the lines and make it to the finish line first.
19. Create Mosaic Patterns on Cement or Wooden Fences
Create a crisscross pattern with tape on a paved area or on a wooden fence, forming sections of varying sizes of shapes. Fill in the sections with different colors of chalk. Remove the tape when all sections have been filled to see the beautiful pattern that resembles a mosaic or stained glass.
20. Compare Nature’s Drawing Materials
In the garden, collect various natural items that may be used for drawing on cement: rocks, gravel, sticks, dandelions, and acorns, for example. Draw and write on the cement with regular chalk and then with the various items found, comparing the results.
21. Make a Twister Board
On cement, draw and fill in large circles of various colors, placing them fairly close together. The leader randomly calls out a color and “left” or “right,” along with “foot” or “hand.” The players do their best to follow the directions and touch that color with the limb called out without falling down.
22. Design a Counting or Alphabet “Garden”
Kids love to draw flowers! On the sidewalk or other cement area, draw large circles for flowers, leaving the main flower part uncolored and writing a number 1-10 in each space. Your child then draws the matching number of petals on each flower. Stems and leaves can be added at the end.
23. Play Dice Matching
Draw a large rectangle on cement and divide it into six squares, labeling them 1-6. Using regular or oversized dice, take turns rolling a die, picking it up, and running to the square with the number that matches. Have your child recount the dots aloud as a double-check and for counting practice.
24. Make Puffy Sidewalk Paint
You can make your own puffy sidewalk paint with things you already have around your home. Mix flour, water, dish soap, and grated sidewalk chalk, funneling into squeeze bottles, one for each color. Squeeze the mixture onto cement, where your child’s art stays puffy until rinsed away.
Not only do children explore creativity and their artistic sides, but they also practice early maths and literacy skills through these activities with chalk.
In addition, they build large motor skills in many of the scenarios and develop their small motor skills every time they pick up a piece of chalk!
*Content provided and created by National Association for the Education of Young Children